Retailer Locator
Find an EcoPoxy Retailer
Building an epoxy casting mold is a key step when creating a river table or any large casting project. This guide will take you step-by-step through the process of building your own mold.

Set up a worktable where you can build and use your mold. You should be able to reach all parts of the inner mold cavity easily. A sheet of polyethylene (vapor barrier) can be placed over the worktable to ensure that clean-up is quick and easy. We recommend taping the edges of the polyethylene sheet securely to the table.

We recommend using EcoPoxy’s Epoxy Mold Release Tape to clad the base and wall components of your mold. The best substrates to use to build your mold are melamine, medium density fibreboard (MDF), or smooth plywood. If you are wondering about other materials for your mold surface, see below for a list of materials that epoxy will and will not stick to.
Epoxy will stick to:
Epoxy will not stick to:
Below is a sketch showing the basic design of a mold. When planning your mold, make sure to account for wall thickness when cutting pieces to size. Make sure the walls are taller than the wood slab or embedded item. We recommend a ½” above the top of the pour.

Extending the surface of the base as shown above will allow you to see your seams, in case you have a leak to patch during your pour. This will also provide extra leverage to help disassemble the mold, once your piece has cured.
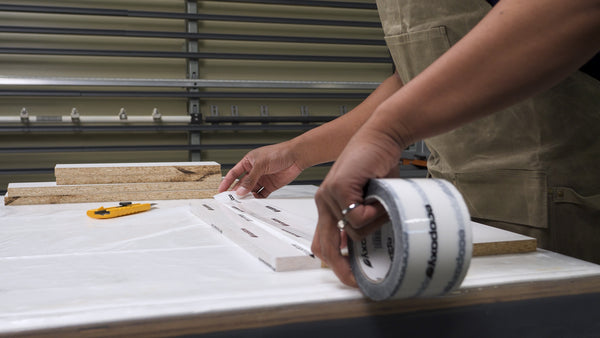
Cover all of your mold cavity surfaces with EcoPoxy’s Epoxy Mold Release Tape (or any other sheathing tape). This will help prevent the epoxy from sticking to the mold and allows for easy removal of your project once the resin has cured. Ensure the tape is completely flat and sealed to the mold surface.

Once every surface of the mold cavity is covered in mold release tape, drill pilot holes to assist with assembling the walls and base. Assemble the walls and base using screws and the pilot holes. We recommend using screws for assembly to make it easier to disassemble the mold once your project is complete, and to increase the chance that your mold can be re-used for a future project. For added leak prevention, you can apply a bead of silicone to the bottom edge of the walls to create a sealed butt joint where the walls meet the base of the mold.

Ensure the mold cavity is clean of dust and contaminants before you seal the edges. Use a lint free cloth with denatured alcohol to remove any dust or debris from the mold cavity. Along all the inner joints, apply a bead of silicone to ensure the epoxy will not be able to leak out of the mold. This process is similar to how you might caulk a bathtub.
Make sure the silicone is smoothed and spread properly to fill all of the seams. Allow the silicone to set before pouring epoxy into the mold. Please refer to the silicone manufacturer's instructions for set time. Once the silicone is set, clean your mold cavity once more with a lint free cloth and denatured alcohol.

Tip: If this is your first project, consider adding a fillet of silicone to the outer edges of the walls and base to guard against leaks.

Level the mold on the worktable. If required, place the mold on wooden blocks (or similar) to allow access to the bottom of the mold for clamping your wood slabs or other embedded objects. Adjust level as necessary with wood shims, washers, or any other items available in your shop space.
Next, you will add your wood slab or embedded item to the mold cavity. Be sure to clamp down the object to avoid having it float during the casting process. Use a block of wood covered in mold release tape between the wood and the clamp, to ensure the clamp does not bond to your project. You can also use weights (covered in mold release tape) to prevent your slab or objects from floating.
Warning: If your wood slab is warped and you attempt to clamp it flat, excessive clamping force can cause the mold to warp. Adding a stiffener, like a second layer of melamine or MDF, to the base will help prevent the mold from twisting.

Your preparation is complete and you’re ready to pour. Please refer to the FlowCast® Application Guide for casting information and directions regarding mix ratio, pour depth, multi-layer pours, and cure time.

Once your project is fully cured, you can remove the walls of the mold and use a putty knife, prybar or wedges to gently remove the casting from the mold. Remember, the added base material will provide leverage points for demolding.

If you want to see inspirational video tutorials, you can subscribe to our YouTube channel, and while you’re there, be sure to click the notification bell, and hit the Like button. For more inspiration you can also like and follow us on Facebook, and Instagram, and visit us any time at ecopoxy.com.